Advanced JUnit 5 Testing
This module will cover some additional features and usages of JUnit 5 Test, such as dynamic tests and test factories.
Working Example
Let’s consider we want to test the following function:
public class MyMath {
    public static boolean isPrime(int number) {
        return false;
        //TODO: Stub
    }
}
This (as yet unimplemented) function is going to tell us whether or not a given int input is prime or not.
We could create a list of tests, like:
public class MyMathTest {
    @Test
    public void test_isPrime_1_false() {
        assertFalse(MyMath.isPrime(1));
    }

    @Test
    public void test_isPrime_2_true() {
        assertTrue(MyMath.isPrime(2));
    }

    @Test
    public void test_isPrime_3_true() {
        assertTrue(MyMath.isPrime(3));
    }

    @Test
    public void test_isPrime_4_false() {
        assertFalse(MyMath.isPrime(4));
    }

    @Test
    public void test_isPrime_5_true() {
        assertTrue(MyMath.isPrime(5));
    }

    @Test
    public void test_isPrime_6_true() {
        assertfalse(MyMath.isPrime(6));
    }

    @Test
    public void test_isPrime_109_true() {
        assertTrue(MyMath.isPrime(109));
    }

    @Test
    public void test_isPrime_121_false() {
        assertFalse(MyMath.isPrime(121));
    }


}
And there’s nothing wrong with that. However, there are some shorter hands ways to write tests:
Parameterized Test
One way is to write my tests as parameterized tests
public class MyMathTest {
    @ParameterizedTest
    @ValueSource(ints = {1, 4, 6, 121})
    public void isPrime_false(int input) {
        assertFalse(MyMath.isPrime(input));
    }

    @ParameterizedTest
    @ValueSource(ints = {2, 3, 5, 109})
    public void isPrime_true(int input) {
        assertTrue(MyMath.isPrime(input));
    }
}
Here, I have two sets of tests (not two tests!), one that expects isPrime to return false (isPrime_false) and one that expects true (isPrime_true). When I run these tests, I’m actually running 8 separate tests. This effectively translates to exactly what I wrote above with 8 “written-out” tests.
The advantage of this approach is that it becomes much easier to write “redundant” tests (that is, adding another input that should produce a particular output).
Some notes are that this is limited on what @ValueSource types you can use. In fact, you are limited to:
- short
- byte
- int
- long
- float
- double
- char
- String
- Class (not Object!)
We can also only pass one argument at a time, which limits what kind of methods we can test. Additionally, each test can only use one expected value, so for instance this would be useful if we were to write a square root method, where each input maps to a unique output.
For a deeper dive into this feature, you can take a long at this Baeldung article.
One source we can use to get around some of this is @csvSource. For example, consider the following code:
public class Person {
    private String firstName, lastName;

    public Person(String firstName, String lastName) {
        this.firstName = firstName;
        this.lastName = lastName;
    }

    public String getFirstName() {
        return firstName;
    }

    public String getLastName() {
        return lastName;
    }

    /**
     * Gets the length of the name where first and last name are concatenated with a space between.
     * Example, firstName = "John" (4 characters), lastName = "Smith" (5 characters),
     * so "John Smith" = 10 including the space
     */
    public int getNameLength() {
        return (firstName + " " + lastName).length();
    }
}
We can use @csvSource as follows:
class PersonTest {
    @ParameterizedTest
    @CsvSource(value = {"John,Smith,10", "Jane,Doe,8", "A,B,3"})
    void getNameLength(String firstName, String lastName, String lengthString) {
        Person testPerson = new Person(firstName, lastName);
        int expectedLength = Integer.parseInt(lengthString);
        assertEquals(expectedLength, testPerson.getNameLength());
    }

}
Now, we can think of each test like a line in a CSV file we are parsing. In the above cases, the first two columns, while our third column is used to state the input. That is, the three value in each “row” of our @CsvSource map to an argument, in-order. So for our first test case: "John,Smith,10", the inputs to our test function getNameLength are:
firstName-"John"lastName-"Smith"lengthString-"10"
Be aware as a limitation that all data in @CsvSource is a String, so you will likely need to use methods like Integer.parseInt or Double.parseDouble for any numeric values.
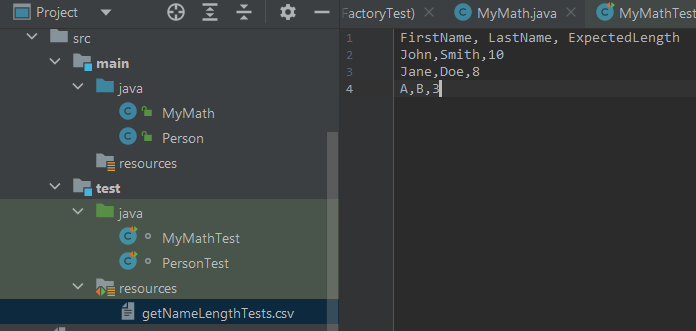
In fact, as the name suggests, we can use a literal CSV file to design our test cases using @CSVFileSource. For example, say I have the following file “getNameLengthTests.csv” saved into my src/test/resources folder:
I can then write my test as:
class PersonTest {
    @ParameterizedTest
    @CsvFileSource(resources = "getNameLengthTests.csv", numLinesToSkip = 1)
    void getNameLength(String firstName, String lastName, String lengthString) {
        int expectedLength = Integer.parseInt(lengthString);
        Person testPerson = new Person(firstName, lastName);
        assertEquals(expectedLength, testPerson.getNameLength());
    }

}
Note that the resources argument assumes the CSV is inside of the src/test/resources folder. Additionally the optional argument numLinesToSkip is used to skip the header row (if you don’t wish to have a header row, you can leave this line off). You can also add comments to your test case resource files at the top and just skip the lines containing comments/headers.
TestFactory
Another approach that improves over some of the limitations of Parameterized Tests, but works towards the same idea, is to define multiple tests at once is a TestFactory instead.
public class MyMathTest {
    @TestFactory
    public Stream<DynamicTest> isPrimeTests() {
        List<Integer> inputs =   List.of(    1,    2,    3,     4,    5,     6,  109,   121);
        List<Boolean> expected = List.of(false, true, true, false, true, false, true, false);

        return inputs.stream()
                .map(number-> DynamicTest.dynamicTest(
                        String.format("Test isPrime: %d", number),
                        () -> {
                            var index = inputs.indexOf(number);
                            assertEquals(expected.get(index), MyMath.isPrime(number));
                        }
                ));
    }
}
On the line where I define inputs, I use extra spacing so that each input lines up with its expected output on the next line. Be aware this is just a style choice to make the relatinships clearer, and not necessary.
The idea here is that I’m not writing a test, I’m writing code that dynamically generates tests. In this case, I define my inputs and outputs as two lists; the first is of input type (Integer) and the second of output type (Boolean). From here, I create a DynamicTest for input/output pair. Now, I can add tests if I need to simply by adding another key-value pair, rather than writing each test entirely on its own.
So, for example, if my implementation of MyMathTest were as follows:
public class MyMath {
    public static boolean isPrime(int number) {
        if (number < 0) {
            throw new IllegalArgumentException("Cannot determine primeness of negative number");
        }

        int root = (int) Math.sqrt(number);
        for (int i = 2; i <= root; i++) {
            if (number % i == 0) {
                return false;
            }
        }
        return true;
    }
}
…I would actually fail the test where isPrime(1) should return false (in the above code, it returns true).
Running my tests, I get:
Test isPrime: 1
expected: <false> but was: <true>
Expected :false
Actual   :true
And so, I change my code to fix this with a simple “guard” condition.
public class MyMath {
    public static boolean isPrime(int number) {
        if (number < 0) {
            throw new IllegalArgumentException("Cannot determine primeness of negative number");
        }
        if (number == 1 || number == 0) {
            return false;
        }

        int root = (int) Math.sqrt(number);
        for (int i = 2; i <= root; i++) {
            if (number % i == 0) {
                return false;
            }
        }
        return true;
    }
}
And then all my tests pass! If I look at my test log, you’ll notice that with my test factory, I didn’t run just 1 test, but 8 tests. That’s because my isPrimeTestFactory() function returns a Stream of 8 tests, rather than 1.
This also lets us bypass the need to use things like @CSVSource for @ParameterizedTest, as we can actually create the objects we want directly:
public class PersonTest {
    @TestFactory
    Stream<DynamicTest> getNameLength_TestFactory() {
        List<Person> personInputs = List.of(
                new Person("John", "Smith"),
                new Person("Jane", "Doe"),
                new Person("A", "B")
        );

        List<Integer> expectedLengths = List.of(10, 8, 3);

        return personInputs.stream()
                .map(person -> DynamicTest.dynamicTest(
                        String.format("Test Person: %s %s", person.getFirstName(), person.getLastName()),
                        () -> {
                            var index = personInputs.indexOf(person);
                            assertEquals(expectedLengths.get(index), person.getNameLength());
                        }
                ));
    }
}
The key advantage
The key advantage of Parameterized tests and test factories is that it reduces the cost of adding new test for an existing function. Instead of copying and pasting a potentially large test, and having to make sure you edit the input correctly, you are instead writing one test, but defining multiple inputs/outputs that utilize the same test code.