Installing JavaFX
In this article, I walk through installing JavaFX such that you’ll be able to run JavaFX applications on your local machine and running JavaFX programs in IntelliJ.
You can find a guide for installing and using JavaFX in IntelliJ here. You can see how to add JavaFX to an existing Gradle project in IntelliJ here. Note that this requires the use of a module-info class, which we will talk about in this article.
JDK and JavaFX version numbers
For this class, we will be using JavaFX 21, along with JDK 21.
First, be aware that the major version numbers for your JavaFX version and JDK version should match. For instance, if you were using, say, JDK 17.0.x, you should also use JavaFX 17.0.x in your development.
The minor version number (the number after the last decimal point) should not matter– for instance, if you are running JDK 21.0.8, JavaFX 21.0.9 should still work without issue.
JDK 21
You can download Java 21 from Adoptium here: https://adoptium.net/temurin/releases?version=21 Make sure to download the JDK, not the JRE!
If you’re on Linux, Java 21 may be available through your distro’s package manager:
- Debian-based:
apt install openjdk-21-jdk - Red Hat/Fedora-based:
dnf install java-21-openjdk-devel - Arch:
pacman -S jdk21-openjdk
If it’s not available, you can also download it from Adoptium above.
JavaFX 21
JavaFX can be downloaded here - https://gluonhq.com/products/javafx/
Be aware, you will need to select the version you want from the dropdown:
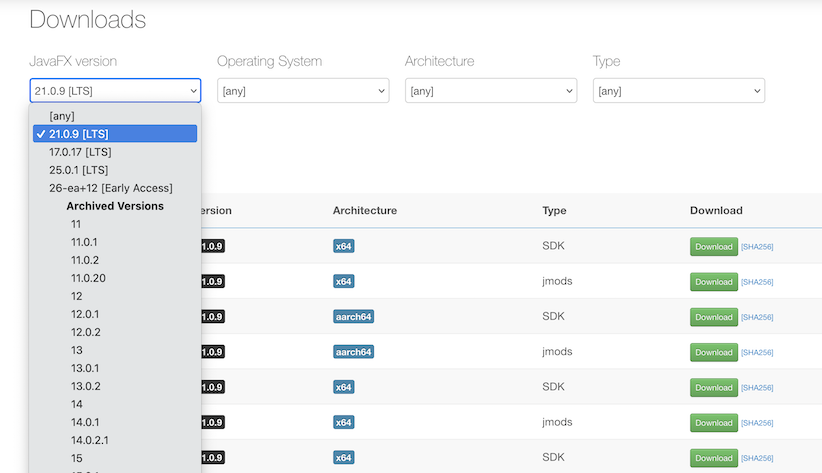
Make sure you select JavaFX 21.0.9 if following this guide, then download the appropriate SDK (not any of the “jmods” options) for your operating system/processor combination.
Note for Mac users: If you download JavaFX for the wrong processor architecture (e.g., Apple Silicon for an Intel Mac or vice versa), you may get an error about the QuantumRenderer. Just repeat this setup process with the correct build of JavaFX and the issue should go away.
Setting JavaFX environment variables
It is recommended, though not required, to setup a system variable to help use JavaFX.
First, find where your JavaFX is installed, and specifically find the lib folder inside of the folder javafx-sdk-21.0.9 (adjust the version number as needed).
On Linux/Mac, you can run the following command, replacing path/to with the path to your javafx-sdk-21.0.9 folder.
export PATH_TO_FX=path/to/javafx-sdk-21.0.9/lib
On Windows, you can use the following command, replacing path/to with the path to your javafx-sdk-21.0.9 folder
set PATH_TO_FX="path\to\javafx-sdk-21.0.9\lib"
build.gradle
JavaFX is not added like a dependency in Gradle. Rather, it is added as a plug-in. As such, here is an example build.gradle that sets up to use JavaFX 21.0.9.
plugins {
    id 'java'
    id 'application'
    id 'org.openjfx.javafxplugin' version '0.1.0'
}

javafx {
    version = '21.0.9'
    modules = ['javafx.controls', 'javafx.fxml']
}

repositories {
    mavenCentral()
}

dependencies {
    testImplementation platform('org.junit:junit-bom:5.9.1')
    testImplementation 'org.junit.jupiter:junit-jupiter'
}

test {
    useJUnitPlatform()
}
Be aware that you will still need to install JavaFX manually, as well as use VM arguments to run JavaFX applications.
VM Arguments
To run a JavaFX Application in IntelliJ, you’ll need to add VM arguments to the run configuration. To do this, go to Run Configurations, select the application file you want to run, and then you need to select “Modify Options” and turn on “Add VM options”:
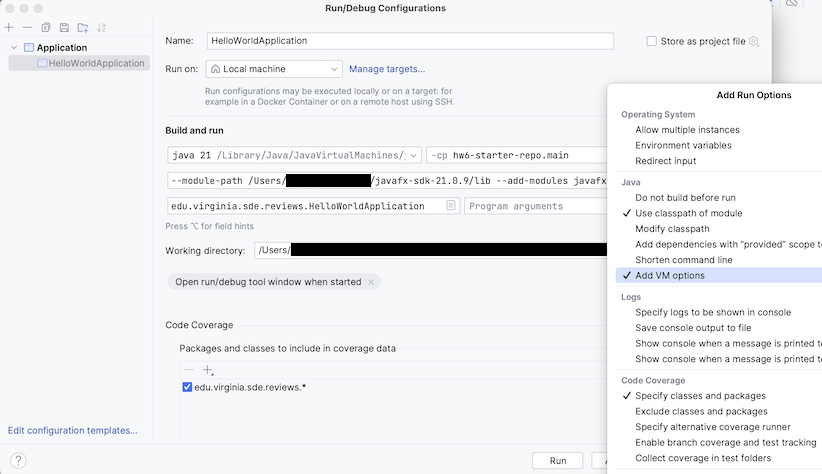
Then, set the VM options to:
On Mac/Linux:
--module-path $PATH_TO_FX --add-modules javafx.controls,javafx.fxml
On Windows:
--module-path %PATH_TO_FX% --add-modules javafx.controls,javafx.fxml
Do NOT add any extra spaces, such as adding a space after the comma after javafx.controls.
At this point, you should be able to run the file. If you are still having issues, try using the path to JavaFX directly in the VM Arguments, instead of the PATH_TO_FX environment variable:
On Mac/Linux:
--module-path "path/to/javafx-sdk-21.0.9/lib" --add-modules javafx.controls,javafx.fxml
On Windows:
--module-path "path\to\javafx-sdk-21.0.9\lib" --add-modules javafx.controls,javafx.fxml
Running without VM Arguments
If you run a JavaFX Application without the VM arguments, you’ll get the following error message or something similar:
JavaFX runtime components are missing, and are required to run this application
And the application will not run. So make sure you set the VM arguments up correctly. If you are still getting this error after setting VM arguments, make sure you are using the path to the lib folder inside of your JavaFX folder, not the JavaFX folder itself, in the VM arguments.