Git Basics
In this unit, we will dive into specific usage of git. This is meant to be a “getting started” tutorial. This will not cover all advanced usage of git. However, there are a number of more robust tutorials to be found online.
Login/Permissions issues with GitHub
In this unit you will login to Github in IntelliJ. Typically, you cannot use your GitHub password to login to GitHub via a third party app.
If you are having any login issues, it’s most likely that you are not logging in with a personal access token.
Review the documentation here for how to create a Personal Access Token.
When you need to select permissions, you should give the following:
- repo (which will check repo:status, repo_deployment, and public_repo)
- read:org (under admin:org)
- gist
Then, once you have the personal access token, you can use it as the password in either IntelliJ or any other program that requests an email/password to connect to your GitHub account.
.gitignore
When we create a new project, one of the first files we want to commit, even before we start writing code, is a .gitignore file. A .gitignore file tells git which files not to commit relative to its current location.
Consider the following example .gitignore
# Gradle related folders
build/
.gradle/

# Local settings files
gradle-app.setting
.settings/
.classpath
.idea/**/workspace.xml


# Ignore java compiled files
*.jar
*.class

# Don't ignore gradle wrapper jar
!gradle-wrapper.jar
This is an incomplete excerpt from this .gitignore file. We will discuss this project and gradle in a later unit. You are welcome to use the linked example as a .gitignore file, but I would encourage you to delete lines 1-3, as ignoring Excel files is unique to that project.
Here we are telling git to never commit the folders build or .gradle. This
is because we only want source code on our remote repository. We do
not want to include compiled files, as compiled files are much larger, and
unnecessary to upload and download, as we will build the compiled files
locally on our workstations.
We also want to ignore local settings files like .classpath (which is used
by Eclipse) and .idea/workspace.xml (IntelliJ), as these files tell our
IDEs things like where to find the JDK and JRE on our computer, or how
our IDE is configured for our personal programming. It’s very
important to .gitignore these files, as where my Java installation is
on my computer will almost certainly not match your computer. If we commit
these files, then when anyone pulls, it’s going to overwrite their
own local settings files and could create anomalous results. Further, these
files are not necessary for being able to build the source code, and
we want to limit our git repositories to storing only what is necessary
for building the source code locally.
Be aware that .gitignore files are not retroactive. .gitignore only prevents future commits from adding a file to the repository. It will not remove files that are already in the repository.
Creating a new empty repository
Below are a few simple ways to create a git repository. Please note that for in-class homework, Github Classroom with make a repository for you. As such, you will not do these steps for the homework.
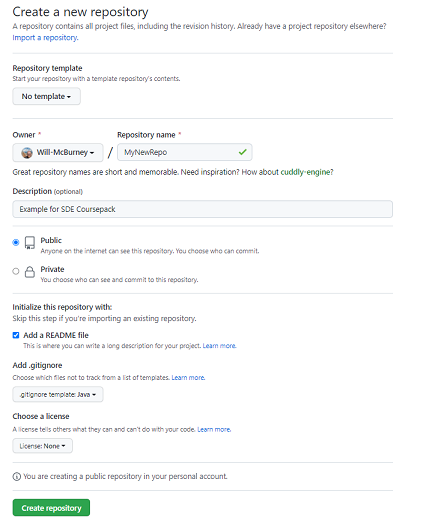
- On Github, you can go to My Repositories, click the green “New” button, and fill out the next page with the settings you want. If you are doing this approach, I generally recommend creating a starting ReadMe, as it makes the next few steps easier. You can then skip to cloning a new repo
- When creating a new project in IntelliJ, you can check the box that says create git repository, and it will make a local git repository. You can then skip to “Pushing a local repo.”
- Using a terminal inside of an empty folder in your system,
you can use
git initto create a git repository. Then, as you add files and changes to that folder, the local repository will track them.
Adding a git repo to an existing project
If you already have a project, and you want to start a repo, there’s a couple ways to do it.
- In IntelliJ, I can click the tab that says “Version Control” in the bottom left, then click “create git repository.” When the file browser pops up asking where you want the repository, you can simply select the same folder you are working in. (Be aware that this creates a main branch named “master”, but you can rename it by right-clicking on name and going to rename after your first commit).
- Do the same
git initas Step 3 under creating a git repository, but in the folder containing the content you want to add to a repo. Then (after you setup your .gitignore file), simply use git add and git commit to add all the files in the folder to the repo.
Cloning a new repo
This is the first step you will do in the homework assignments.
Cloning means downloading an existing remote repository to your local machine.
For simplicity, we’re going to focus on cloning a repository from GitHub, like
this one. Each remote
repository on GitHub has a .git link that is used to clone a repository.
You can find it under the Green “Code” button towards the top right
of the repository’s home page.
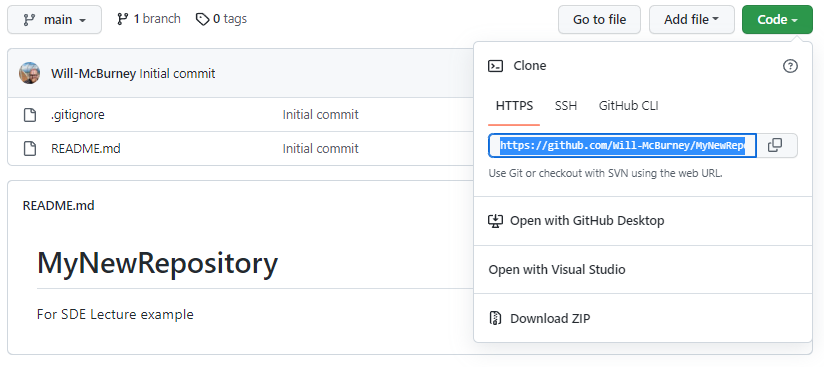
If you are comfortable using SSH, you are welcome to use that, but otherwise, I generally encourage starting out with the HTTPS link. SSH can be more secure and convenient, but requires learning how to set up an SSH key.
- Within IntelliJ, we can open a remote repository as a project with File -> New -> Project from Version Control. From there, click on Github in the column to the left, and you’ll be prompted to log-in to GitHub (unless you are already logged-in in IntelliJ). If you log-in to GitHub within IntelliJ, IntelliJ can find the repositories you have access to, and you can simply select the Repository you want to use. IntelliJ will then automatically download the repository to your computer.
- First, you will need the
.gitlink for the repository. Then, we can use that .git link as the Repository URL in “Repository URL” in IntelliJ. From there, it works the same as option 1. - In a folder on your computer (I tend to use something like
“My Documents/git/” as a location for general git projects, or
“My Documents/teaching/3140 for my examples for this class), open a terminal
and type
git init [url]where [url] is the git link for the repository you want to clone.
Pushing a local repo as a new repository
Generally, the easiest way to do this is going to be in IntelliJ. First, you can only push a repository to GitHub if it has at least one commit. Additionally, you should ensure you commit a .gitignore file before you commit any other files.
- In an IntelliJ project where you have already created a local git repository with Version Control (see Adding a git repo to an existing project option 1) with at least one commit, go to Git -> GitHub -> Share Project on GitHub. At that point, you’ll be prompted to Log-in if you are not already logged in. Then you can specify the name of your repository, deciding whether or not it is private, then hit “Share”
- First, create an empty repository on GitHub and get the git link. Then, in IntelliJ, with an existing repository with at least one commit, make sure your main branch is named “main” (if it’s named “master”, rename it), and then click the green up-right pointing arrow in the top right for Push, or go to Git->Push in the taskbar. Then, in the window that pops up click the blue “define remote” task, and paste the .git link in the URL. Note that you will have to login to GitHub.